CASM would like to thank the following sponsors of the 2013 Sproo-Doo.


|
CASM would like to thank the following sponsors of the 2013 Sproo-Doo.
0 Comments
Have you ever worked on a model that just kicked your butt? Every model has a certain degree of difficulty and some models are more difficult than others. In the large scale figure modeling world it is often the painting that can be daunting but there are some Anime and fantasy figure models where the construction process can also be extremely difficult. I found a model with an extremely dynamic pose that I just had to build. She was wearing a translucent petticoat that was swishing with her movement with a topcoat that was flying in the air over the petticoat. When I received the model in the mail and inspected the parts, I found that the petticoat was composed of nine pieces of clear resin with joints in odd and showing places. The fit of the parts was not intuitive and was more like a complex puzzle. I had never worked with transparent resin before and was uncertain how to proceed, but set about the task. I dry-fitted the pieces, taped them together, and figured the out the puzzle of pieces of the petticoat. So far so good, I thought. Next, I went about the task of gluing the pieces together. As I put the last piece in for gluing… you guessed it… The gap for the piece was about a half inch too wide. That is right, I said a half inch! Foul words and expletives came rolling out of my mouth and I left the work area. I spent the next week thinking about how I would solve the problem of the gap. I even sought advice from others, a wise but unmanly thing to do. The solution was to piece together clear acrylic rod in the gap and sand it to shape. About 40 hours later, quite a bit of super glue, sanding, and polishing the gap was filled and in a shape consistent with the petticoat. Alright, I thought, a modeling mistake fixed and I was ready to move on to the painting. The challenge was to paint the petticoat so that it would remain transparent yet the raised areas would need to be opaque to cover the before mention seams and give the appearance of light reflecting off the raised surfaces of the material. I mixed together a series of transparent paint colors that I thought would achieve the goal. I started with the dark shadows and had mixed together a transparent shade of dark purple that contained dark purple ink. I hand brushed the shadows with the thought that the other colors would incorporate the color for a nice blend of colors. After the first coat the shadows were exactly as I had wanted them to be, transparent, barely visible, and I was full of hope for the next step. I airbrushed next the light shadows with transparent white paint with a slight shading of reddish blue. After I applied the first coat, I took a close look at my work. Seam imperfections showed their ugly little selves and the purple ink from the previous step changed color to red! TRAGEDY! But, not wanting to stop or concede an unfixable error I decided to force the issue and applied opaque whited with the thought that if it could not be transparent, as hoped, I could still make a cool looking petticoat. Well, it became worse and the purple became redder! You know, sometimes you just need to stop. Then I noticed that as I was turning the model while painting I had brushed some of the wet paint with my fingers and sheared off layers of paint in some places! There were rips and jagged areas in spots that would be very visible. Argh! It was nowhere close to my initial vision for the piece. This is a complex model. I had visualized the model before I started the painting. Everything up to this point was equal to my vision. The petticoat is the standout feature. The visual impact of the model rests on the finished petticoat. It truly is a make or break element of the model that takes the model to extraordinary or relishes it to “ho hum.” I had overcome the first construction error, I thought, but the painting revealed a poor finish. The colors and method used left a finish that looked hideous, at best. I discovered the complexity of this model far exceeded my level of modeling skill. In other words, this model kicked my butt and none of the options for fixing it seemed tenable! I know that one of the tenets of modeling is to select models of ever-increasing complexity that challenge a modeler’s skill level. I also know that part of modeling is learning how to overcome errors made in the construction and painting phases. And yet another tenet of modeling is “do overs.” When you mess up too bad you “do over.” Yesterday I was left in a state of frustration, despondency, and malaise and was ready to just leave it as it was and let everyone remark about “missing the mark.” Such was my level of mood that my wife remarked “Does this mean we are going to have a bad day for the rest of the day?” The lofty tenets of modeling did nothing for bringing me out of my mood. However, I was able to compartmentalize my frustration and enjoy the rest of the day which included taking my grandson to the fair. Now that I have had a day to sleep on it, my mind is churning on how to fix the problems. I will probably strip the paint, fix the holes, select different paint for coloring, and start again. Crap! I so wanted to have this part completed by the end of the weekend. Did I mention: this kit has kicked my butt!” Welcome to the “The Undertaker’s Parlor” where the torchlight penetrates the darkness and shines upon things that go bump in the night………. For this first edition, I thought it befitting to focus our discussion on the basics of building styrene figure kits with the model kits that changed the face of the hobby forever, the Aurora Monster Models! Although the original 13 kits made their debut 51 years ago, they have stood the test of time and are re-released periodically allowing each new generation of modelers to build and enjoy these timeless classics. Several figure modelers I know tend to distance themselves from styrene figure kits for the sole reason of the seams that have to be dealt with. I have never really understood this as I have found that the seams are no worse than the ones found on their vinyl and resin cousins. I admit that there are more seams to deal with on a styrene figure but a little patience and elbow grease really goes a long way. In fact, building styrene monster kits takes very few tools and supplies. You will need liquid cement (Tenax 7R or Tamiya Extra-Thin), modeling putty (Aves Apoxie Sculpt), a hobby knife, sprue cutters, rubber bands or clamps, sandpaper (Testors sanding films), jeweler files, and fine steel wool (use 000 grade or finer). For painting kits, various sizes of flat and round sable brushes and a good selection of acrylic paints is really all you need. I prefer acrylics over enamels or lacquers because they are very easy to use and cleanup with soap and water or rubbing alcohol. You can utilize an airbrush to paint your kits but that is as they say, a subject and art form all its own. The Wolf Man: Pure of Heart “Even a man who is pure of heart and says his prayers by night, may become a wolf when the wolfbane blooms and the autumn moon is bright…” After spending a little time reviewing the kit instructions and parts I devised a plan and began construction with the base by cleaning up the attachment points and removing any flash. I like starting with the base for two reasons: 1) it helps me get focused on the project by getting me into my modeling “happy place” and 2) a finished base provides a backdrop that helps when choosing the colors for the figure itself. Start by cementing the two large rock halves together. Hold the two halves together with just a slight gap between the parts and brush liquid cement along the joint. Wait about 30 seconds then apply firm pressure. You know you have a good bond when the melted plastic oozes out of the joint. This helps fill the seam between the parts and reduces the amount of putty work needed later on. Keep the parts secure by wrapping them with rubber bands and set them aside for about four hours. Once the cement is dry, scrape down the joint with a hobby knife. Sand the seam using progressively finer grades of sandpaper (I start with 320 and work my way down to 800) until you have a nice uniform surface that follows the kits sculpt. To help further remove the sanding scratches and any minor surface imperfections use fine steel wool to gently polish the surface of the parts. Since I had plans to customize my kit a little, I filled the holes where both rats feet and the skull attach with Aves. You don’t have to do this. Let artistic license be your guide here. After all, it’s your creation. Once the putty work is finished, wash the parts in warm soapy water and allow to air dry. Now on to the painting. 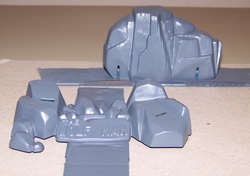 The base sub-assemblies are primed with a medium grey primer. I use Krylon sandable grey sprayed at a distance of about 2 to 2 ½ feet. Doing this allows the primer to “dry” a little before hitting the part and adds a subtle texture to the smooth surface giving a more natural appearance for the rocks. The effect really becomes apparent once the basecoat is applied and the rocks drybrushed.  The next two photos show the parts after receiving a basecoat of Tamiya German Grey. I choose this color because it matched the overall bluish-grey tone that I wanted for the rocks. 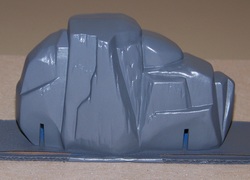 Once dry, I sealed the parts with Dullcote to protect the work up to this point. I then began to overbrush various shades of grey onto the rocks, working the paint “wet” and blending the colors as I went. Once I got a look I was happy with, I drybrushed the highest points of the rocks with a very light grey. I cemented the two base assemblies together with 5-minute epoxy for strength then added the rats, which I painted in reddish-brown shades for visual interest. I never have cared much for the skull that comes with the kit (to hollow for my taste) so I changed things up here by using a leftover skull from my spares box. The lettering was painted with a “blood” red color and everything given a final coat of sealer. 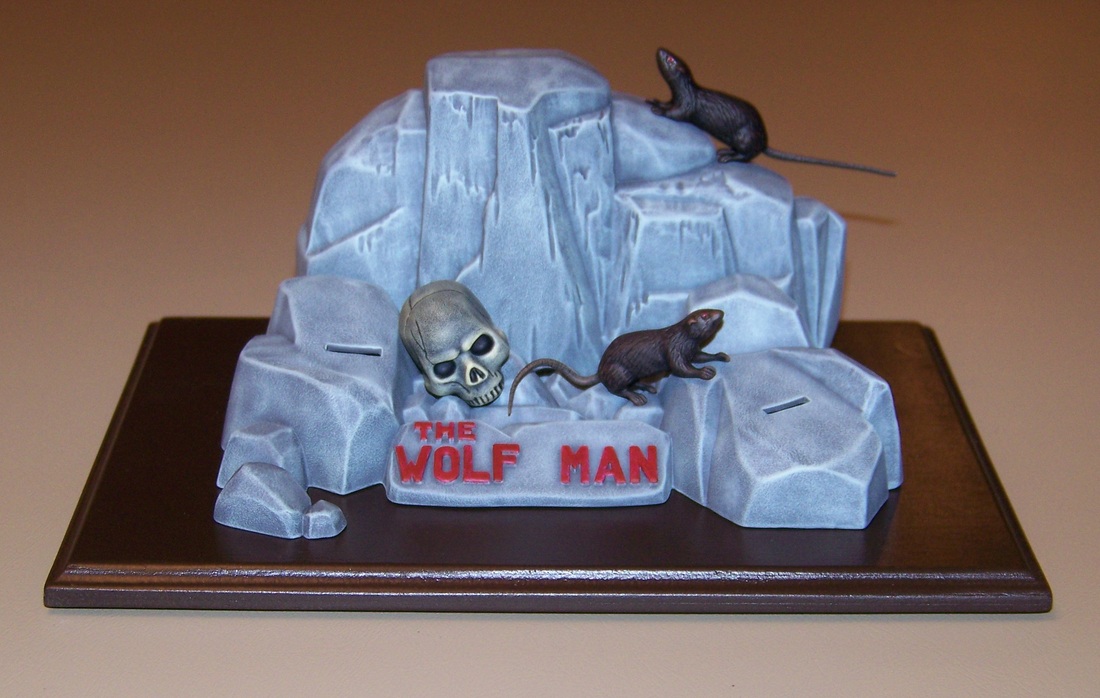 Each month we all come together to talk about modeling and our current projects, or in the case of a few, the project they are planning. Everyone takes a minute and participates by putting their name on a piece of paper to take a chance at winning a gift card from Roger. Once a year we all participate by paying our dues to support the club, then a few months later most participate once more at the contest. Every other year we participate once more by voting for club officers. Some also participate by standing in front of the group and talking about a technique or a skill they would like to share, but for many that is where their participation ends. Being a club member is easy, and participating is just as easy. There are many ways you can raise your level of participation, you can step up and join the show committee, you can knock on doors and call to find sponsors for the show, you can write reviews and articles for “The Scratching Post,” or you can simply read the newsletter and leave comments. You can participate by doing something as simple as leaving the occasional comment. It does not sound like much, and really does not take a lot to do so. By leaving a comment on an article, a story, a review or a column you can help the person that wrote it decide to contribute another. You can help them determine what both you and other club members would like to see in your newsletter, you could help Tom decide how much room to give articles, reviews, columns, photographs and other items. This newsletter, just like the club itself, and the contest, belongs to each member of this club. It is not the property of the club officers, or the editor, it is not the property of IPMS or of HobbyTown. CASM is the property of Richard Buzbee, Lloyd King, Chris Luna, Noel Lawson, Ron Leker and every other person that pays dues and attends meetings. Take a minute the next time you read the newsletter and respond to the article or column you read or the photo you like. Tell the writer what you like, or do not like about what they wrote. Tell them that you think they are off course in their column, suggest how to improve their offering, or what you would like to see them write about next time. Participate the easiest way there is. The U.S. “Sherman” tank wasn’t the biggest tank to see combat in the Second World War. It wasn’t the most heavily armored tank of the war, nor was it the best armed. The Sherman is, however, justifiably thought of as one of the great tanks of that global conflict. It certainly got the job done. It is an unfortunate fact that nothing accelerates technical development like a major war. The United States entered World War II unprepared in a number of ways. One thing America desperately needed was a main battle tank that could carry a large caliber weapon in a fully rotating turret and stand up to current (and anticipated) weapons in the places it might be used. The Sherman answered that need. The British began the custom of naming U.S.-made tanks for American Civil War generals. Thus the U.S. M3 light tank became the “Stuart” and the M4 series of tanks was nicknamed “Sherman.” The names stuck and became universal. The design of any tank involves consideration of many factors. An effective tank is one that combines protection, mobility, firepower, and reliability in just the right amounts. To achieve such a balance, compromises must be made. A tank that is too heavily armored will be slow and will place a heavy strain on engine, transmission, and suspension. Carrying a cannon of adequate caliber, on the other hand, necessitates a vehicle of a certain size, and size means weight. The right balance is hard to find. The design of the Sherman was influenced by a number of carefully considered factors. The tank was designed with a simple box-like hull with vertical sides that allowed rapid production. The tank’s relatively high silhouette resulted from the decision to begin production using readily available radial aircraft engines to power it; the height of these engines and the tank’s angled drive shaft made for a tall vehicle. Other power plants were later developed, but because of the need to keep tanks coming off the production lines without major interruptions, the Sherman’s tall stance was never altered. Another consideration was the need to ship Shermans long distances. The capacity of loading cranes at U.S. and foreign ports was considered; Shermans couldn’t be too heavy for these cranes. The weight-bearing capacity of bridges overseas had to be thought of. The width of railroads cars that would carry Shermans was another consideration that dictated size and made vertical hull sides desirable. The Sherman was designed with sponsons that overhung its tracks so that it could accommodate a turret large enough to carry a 75mm main gun. The initial choice of a relatively short-barreled main gun for the Sherman was a result of the U.S. Army’s particular philosophy regarding the employment of tanks. In this philosophy, tanks were to be used as a maneuvering force to exploit breakthroughs achieved by the infantry. Tanks were not to take on enemy tanks; this would be the job of towed anti-tank guns or U.S. tank destroyers—fast, lightly armored vehicles that resembled tanks with bigger guns and open-topped turrets. This would prove to be a major problem as the war progressed. The Sherman was “king” in the Pacific, where Japanese anti-tank guns, mines, and suicidal infantry were always more of a threat to tanks than enemy armor, but in the European Theater the Germans did not share the idea that tanks should not fight tanks. Under-gunned Shermans in the last two years of the conflict in Europe often found themselves taking on enemy tanks with heavier armor and longer-ranging weapons. The Sherman’s short 75 did have the ability to fire a very effective high-explosive round, but that was small comfort in the tank vs. tank duels U.S. doctrine said would not happen. If it wasn’t the biggest and the best, what made the Sherman a great weapon? Numbers, first of all, helped make up for the tank’s deficiencies. America turned out more than 49,000 Sherman tanks; only the Soviet T-34 tank was made in greater numbers. German behemoths like the Tiger and Panther tanks rarely faced a single Sherman or even an equal number of Shermans. It became a common tactic for American Sherman tankers to keep a Tiger tank busy from head-on while other Shermans maneuvered to strike the Tiger in its more vulnerable sides and rear. Of course keeping a Tiger, with its powerful 88mm cannon, “busy” was a dicey proposition to say the least. Modern wars are won by the side that gets to a battle “fustest with the mostest,” as Nathan Bedford Forrest might have said, but probably didn’t. The Sherman was a model of durability and reliability. Shermans didn’t break down often, but when they did, they were often repairable in the field. Sherman tanks thus did not require a lot of specialized support equipment. When they managed to break out into open country, as happened when the Normandy front was finally ruptured, Shermans were the ideal weapon for “hell-bent for leather” drives far into the enemy’s rear. It is true that Shermans were called “Ronsons” by their crews for their tendency to “light first time, every time” (in part because a lot of crews crammed extra ammo into every nook and cranny of their tanks). It is also true that in some battles in 1944 and ’45 a half-dozen or more Shermans went up in flames for every Panther or Tiger destroyed, but the enormous productive capacity of America’s factories meant those Shermans could be replaced, while the German armored forces were being steadily ground down. Up-gunning of later models of the Sherman did somewhat alleviate the tank’s technical disadvantage against late-war German armor, but in the end it was the “make it simple, make it work, and make a lot of it,” principle behind the creation of the Sherman that made it great. It was the right weapon at the right time. Pre-Registration
It's about that time again! Central Arkansas Scale Modelers are hosting their 13th Annual Sproo-Doo Model Show on September 21st in Benton, AR. The show committee is very excited about this year's show and is inviting everyone to come out to join in the fun. The show is open the the public. Entry fees are listed below. Adult - $10 for one (1) and $2 for each additional model Juniors (13-18) - $4 for one (1) and $1 for each additional model Kids (12 and under) - Free for the first one and $1 for each additional model IPMS Members get a discount! Pre-Registration will be open on the website July 15-Sept 15. For more information about the show or how you can get involved, visit our website atwww.CASModels.org. Pre-registration will decrease the length of time you stand at the door of the contest. All of your forms will be pre-printed and waiting for you at the registration table. Payment for the contest can be made through PayPal on the club site. Don't delay, register in advance by following the links listed below. See you at the contest! See you at the show! Contestant Form Entry Form Editor's Note: This is a re-print of an article by Brent Bristow to help the judges of the upcoming Sproo-Doo Model Contest be fair, impartial, and consistent.
Being asked to judge any event is an honor. It should be a point of pride that others value your work in a particular field enough to allow you to adjudicate. However, it is also a great responsibility, as participants place their hopes and hard work on display for your judgment. While we can enjoy the compliment of being asked to judge, it is of equal importance to put our egos aside and approach each item we are assessing with an open mind. How you conduct yourself during judging is a reflection of your character; preparing your state of mind can mean the difference between encouraging a participant to try harder the next time or giving up completely. Education in the arts has spent years and hundreds of thousands of dollars developing rubrics and formalized systems to help adjudicators have specific criteria in mind. Whether you are judging a painting, musical performance, or theatrical audition, having a breakdown of the important elements in front of you helps to insure you consider all aspects of the subject. Judging a model show, which is an artistic endeavor, should be no different. Many shows have already adopted judging rubrics, but even if you are judging a contest without one, you should have specific criteria in mind before you approach the first piece. The criteria often includes construction, painting, finishing (weathering, decals, shading, etc.), and accuracy/interpretation. Each should be considered on its own merit before determining the final ranking of a model. The judging criteria also allows for specific and constructive criticism. Construction should be easiest to agree upon. If, for instance, an aircraft has uneven wings, a car has wheels that do not all touch the table, or large seams are visible, it should be obvious to a judge and reflected in the score. But, when judges do not approach a piece systematically, they can be blinded to basic construction flaws by a great paint job or after-market parts. Conversely, spotting an obvious flaw upon the first look may prevent a judge from seeing other aspects of the finish that are done very well. By approaching each of the criteria elements separately and in a specific order, adjudicating is an accurate process for placement rather than a gut feeling. The remaining elements present difficulty because of their subjective nature. While decal application may be somewhat cut and dried, the other aspects have as many different approaches as there are modelers. So, it is incumbent upon us to let go of our bias, and look for substance rather than style. For instance, determining if a paint job and/or weathering are well done and appropriate for the piece is much different than deciding if it is done the way you would have done it. Modeling would be a very boring hobby if we all did the exact same techniques. We should revel in the diversity of modeling styles and a good judge is able to determine what level the techniques used have been mastered. Approaching judging with this in mind may even inspire you to try a few new tricks. Accuracy/interpretation is perhaps the trickiest aspect of all. Looking at any piece, you are often asked to determine how accurate it is. You must be careful with this. While most photos may indicate a particular configuration, it only takes one authentic photo with a different scheme to invalidate your judgment. You may have to determine if the modeler tried to build an accurate standard version of the piece and fell short with the accuracy or if they had a different interpretation altogether. If you know the piece, this is probably fairly obvious. If you do not know the piece, relying upon your judging criteria will allow you to place the model based on the merit of the work. A great model with a different interpretation is still a great model, and should be judged as such. A judge must suppress their bias when it comes to subject matter. You may love Corvettes, and are drawn to them on the judging table. Does this mean they deserve a higher ranking? Should you automatically judge it down because you expect more from a Corvette than other car models? While you may be answering no to these questions, separating this preference while in the show room does take a bit of will power. Breaking the criteria into its individual components helps you more easily become an unbiased judge. Another preconception that judges struggle with is based upon the modelers. Judges often know who built the model being judged and form an unintentional bias, favorable or unfavorable, based on their experiences with the modeler. An experienced modeler may be judged favorably even if the piece does not meet his usual standard. It is also possible for a novice modeler to focus a lot of energy into getting a piece right and actually do an exceptional job but be judged more critically because of the pre-knowledge of the judge. The solution to judging bias is to study each piece carefully and judge the model, not the modeler. The next time you are asked to judge, keeping this approach in mind will serve you. Judges that make snap decision based upon first impression, what they like or how they think a piece should be finished do not gain a reputation as a fair and impartial adjudicator. Remember, shows are meant to promote the hobby, not tear modelers down. A systematic method of judging with constructive comments will help to improve the skills of everyone. To know where you’re going, you must know where you’ve been, because your first experiences with anything can cast a long shadow over those that come later. You can neither learn without looking back, nor can you learn in a vacuum. I still remember the first model I built, and it’s probably tucked in a box in a forgotten corner of my mother’s house to this very day. I was ten years old, and my parents took me to the Fort Smith Toys R Us to browse the models section. I went home that early ‘90s Sunday with a Testors model of the chimerical F-19 stealth fighter. I could follow directions just fine, but had no idea of the finer points of modeling technique. I didn’t know how to sand seams shut, or that I needed to, for that matter. I didn’t know that model cement or superglue doesn’t play nice with clear parts. I didn’t know that decals need trimming or a glossy surface to look realistic. After the F-19, I dabbled in aircraft, cars, and Star Trek starships for the next two or three years, rarely finishing anything, and I’ve since incorporated a couple of those surviving projects into my current backlog. Except for a poor eighth-grade attempt at building an Apache attack helicopter with a friend, modeling was a solitary pursuit. Later that year, another friend introduced me to Games Workshop’s Warhammer 40,000 tabletop wargame, and everything changed. I learned a few things by then, and at 14, I had a bit more cash to spend on hobbies, and I quickly immersed myself in a Blood Angels Space Marine army equipped with the Emperor of Mankind’s finest shooty and stabby things. I invested heavily in quality brushes and Games Workshop’s easy-to-use line of acrylic paints, and my modeling skills leapt forward. I only managed to paint about half of my army before moving on to other things, including GW’s gang warfare game Necromunda, but I held on to most of it, and I am currently working on the most attractive pieces of it, including a “Chaplain” that I finished earlier this year (which can be found here and here). At this stage, I built and painted models with a few close friends, swapped techniques, and studied their how-to books religiously before deploying them onto the imaginary battlefields of the grim, dark future. After a lull in high school, I got back into modeling after gaining my own transportation and income prior to my senior year. I built my first decent car, a 1990 Nissan 300ZX twin turbo that wasn’t anywhere near perfect, but was a great learning experience, then moved on with a couple friends to Japanese giant robots, or mecha, known as Gundams. Modeling went by the wayside during my second half of college, and much of my post-grad life, but a college friend got into Mobile Suit Gundam about four years ago, and that instantly jumpstarted my interest in modeling once more. I lent him my paints, my tools, and I taught him basic techniques as we built our newly acquired mecha in the comfort of his North Little Rock home. It also helped that modern Gundam kits are highly detailed as well as easy to build, and he’d done a fairly good job with them despite a minimal effort. I returned to cars three years ago, but my endeavors there were solely solo pursuits, not counting stuff I learned off the internet. All that changed when I bought a Battlestar Galactica Viper Mk II fighter and some supplies at the Little Rock HobbyTown in mid-2011. The cashier pointed me towards a modeling club that met there every first Saturday of each month, and I was excited to see what it was like. I was surprised with what I saw at my first CASM meeting that June. A little bit of everything was represented—sci-fi/fantasy, figures, armor, aircraft, cars—and people discussed tricks and techniques, and best of all, it had an online presence to which I felt at home. That first meeting, I brought a finished Gundam model, a finished Audi sports car, and at the next meeting I brought my then in-progress Viper space fighter. I was amazed with other people’s work, but also felt intimidated and vulnerable showing my own work, as well as possibly being the youngest modeler in the room. After that weekend, I became a member of CASM and the SF/fantasy interest group, the Fellowship. At my first Sproo-Doo, I won a gold medal and a best in sci-fi plaque for that Viper. I owe my victories entirely to my experience with CASM. So what was the point of this history lesson? That social interaction matters. I cannot emphasize this enough! In the modeling hobby, we need other people with whom to share techniques, to sound off on for ideas and new perspectives, and ultimately, to broaden our (and each other’s) horizons. Our Friday evening Fellowship meetings at HobbyTown, and group work after CASM meetings perfectly reflect this reactor of ideas and skill. It also helps to find new places to get a bite to eat and geek out about our work and the motivations that inspire it as well. Going out to eat and hanging out at Barnes and Noble with new friends will be one of the best things I will remember about bringing other people into my corner of the scale modeling world, so without CASM, I would not have had as nearly much guidance to improve my skills, or to develop a broad network of friends to challenge my horizons, which now include a budding interest in figures and armor. Additionally, I’ve received plenty of advice and encouragement. For example, I owe CASM members with helping me pick a custom color for a 1970 Mustang I finished last year, I discussed vehicle mechanics and taking a civilian-style route with Kenneth Childres for one of his custom-designed zombie apocalypse vehicles this year, who in exchange also advised me on how to make brick ruins from plastic rod, and Steve Wilson influenced me and Kenneth into exploring zombie apocalypse vehicles in the first place, among many, many other things. I can only hope to have been a positive influence on others in our groups as well. Ultimately, social interaction in modeling is about preservation. We need to share our work for it to matter even more, and we need social interaction to maintain the hobby in the face of threats to its survival, including the ongoing economic troubles, on-demand digital television and film, and video games. Don’t get me wrong, I like film and games as much as the next guy, but they simply cannot compare to the imagination and effort needed in the creative pursuit that is scale modeling. Each and every one of us is the guardian of this fine tradition, and the only way we can keep it alive in the face of every threat aligned against it is not just to stand together, but to encourage future generations to continue it. The Pulaski Tech crew has done a phenomenal job bringing scale modeling to kids, and recent talk of networking with other regional chapters encourages our hobby a better chance for survival. Sure, we can live our World War II, modern war, or apocalyptic fantasies through movies, TV shows, and games, but it is the scale model that truly brings them to life in ways that the former never can, and never will, and we owe sharing our collected skills and input to make them the best that they can be. Broadening our own horizons for the sake of this hobby, embracing other categories and techniques not yet familiar with us with little reservation and judgment, and even stepping outside our comfort zones and trying new things every once in a while can only help our efforts, not hurt them. There is nothing wrong with having preferences, but nothing builds our own skills, characters, and the growth of this hobby by exploring new things and concepts. We are all guilty of living in our own boxes, but this is something we can all fix. The future of scale modeling will depend on this. |


